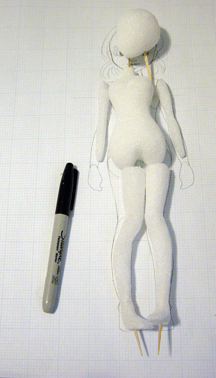
So I finally decided to go ahead and get started on Cookie. I am using La-Doll and Premier clay, so I decided I would go ahead and follow Ryo Yoshida’s doll making methods from the Yoshida Style Ball Jointed Doll Making Guide. In the guide you cut your cores/armatures out of styrofoam based off of your drawings. I’ll get more to the method later, but in the picture above was my first attempt at carving the body core using the blue polystyrene insulation foam board. As you can see the core turned out terrible with way too many pock marks. Naturally I was displeased and I tried to figure out whether or not it was my tools that were the problem or whether you just shouldn’t carve out with the blue insulation foam. I’ve seen other people use the blue foam before to good effect, but it just wasn’t working for me with what tools I had so I decided to go out and get myself a sheet of the white styrofoam.
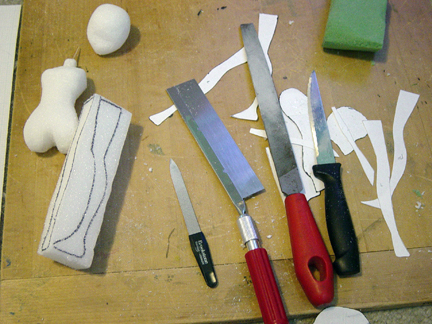
I had much more success with the white styrofoam with the tools I had, which you can see all my tools in this pic. I primarily used the serrated steak knife for cutting, but the big serrated craft blade is good for cutting blocks of styrofoam and makes nice smooth cuts. You will also need a metal file to smooth your edges and shape the form. I used a combo of the big file, and a little file for smaller corners and details. For the small file any old metal nail file will do.
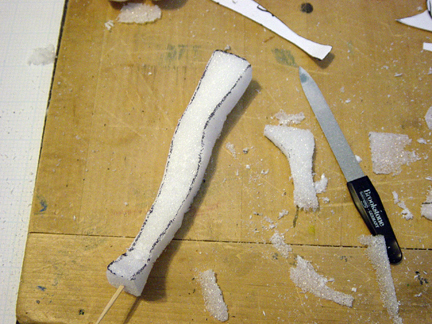
So I also said I would give a little instruction on how to do this. The Yoshida Style book has lots of nice pictures to follow the method, but if you don’t read Japanese you’ll be at a little bit of a loss. Also the Yoshida Style book makes everything look insanely easy, which it is so not! Anyhow in the pic you can see the body core which has already been cut and filed, but I am just getting started on the leg. What you want to do is cut paper templates by tracing your drawing, however you will want to trace inside your lines so you leave an allowance for the clay…..think of it kind of like a backwards seam allowance, lol. 😉 I used regular printer paper for my templates, which you can see strewn about in the pic above. However I have a lightbox to trace with, so if you don’t have a lightbox you can either trace during the day and use your window, or you could just buy yourself some tracing paper. To start carving you will want to take your templates and trace their outlines, both side and frontal view onto your styrofoam like I have done in the picture.
Now when you start cutting you will want to start with the side view, and pretty much forget that the front view exists for now. You have to be careful when you are cutting though, because you’d like your cut lines to be as straight through as possible. I know that I wrecked a previous experiment where my knife went in at an angle and cut the other side too thin. 🙁
Next, you want to trace the front view of the leg onto the side view piece you just cute….and naturally you trace the front view template onto where the front of the leg would be. 😉 Basically then you cut around the outline again and you will wind up with a boxy looking leg like in the picture. At this point you’ll want to get the metal files after it and start making things more rounded and make general adjustments to the shape.
 While you are adjusting you shape you can lay your pieces down on your drawing to compare to both your front and side views to be sure you have the right shape and to file down any areas that have turned out too thick. This is of course another reason why you should always start out with a planning sketch, especially if you are a beginner. I know a lot of young people like to cut out this step, or just do sloppy concept sketches that are not in scale. It is really important to have this “blueprint” to look back on. Nobody would ever consider building a house without a blueprint first and you shouldn’t create a doll either without your base scaled design either. Ok, I’ll stop my art teacher lecturing now, lol. XD
Anyway once you get all of your foam core pieces just so, then you can go ahead and roll out your clay and apply them to your foam cores. The concept in the Yoshida style book is that you roll out your slab of clay between two chopsticks to get the perfect uniform clay width and then after scoring the inner side your wrap it around your cores and shape them. This is just supposed to be the first base layer of clay however, because the Yoshida Style book has you doing lots of sanding and reapplication of clay to the base clay form you have created. Because of how La-Doll and Premier handle, I feel that this way is probably the best way to construct….well at least at this point in time….I may have more experiences down the way that make me think something else, but this way I do feel is good for beginners at least.
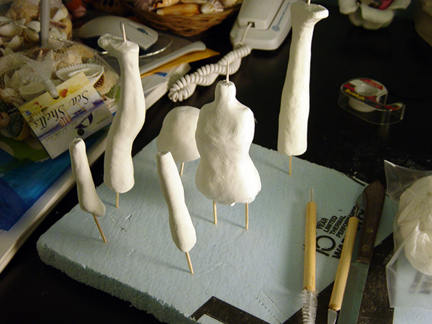
Above are my pieces, all wrapped in clay and stuck with toothpicks into a block of foam so they can air dry. The reason you have the piece suspended to dry is mainly because if you leave them lying flat you will wind up with a flat side on the area that is lying on the table. Another somewhat lesser reason is for even drying. Anyway the pieces all have some lumpiness and need to go through their first sanding, but at this stage perfection is not needed.
Another thing I want to mention before finishing this post is to talk a little about the differences between La-Doll and Premier clays, both of which are made by the same company and can be mixed together. La-Doll is a heavier clay and seems most like a natural clay out of the two. However it is said that La-Doll is a little bit more fragile than Premier. Premier clay on the other hand is lighter weight,and it’s chemical make-up is different so it may remind you of working with a plastic cream cheese. It is said though that despite it’s lighter weight, that it is actually stronger than La-Doll. I had read where doll artists would often mix these two clays so you can have the ease of use of La-Doll, but have the added strength of Premier. This is what I ended up doing to make Cookie. Now you can also find both clays already mixed together. It’s called Pre-mix and is generally the same price as La-Doll. You can also of course mix your own as well, but I found it to be a little time consuming and I kept on having to apply small amounts of water so the outer edges of the clay would not start drying out. If you want to save time I’d just buy Pre-mix, but if you have Premier and La-Doll lying around, may as well go ahead and mix it up.
Well, that’s it for now as this post has become rather long. Right now I’m still waiting for Cookie’s body parts to dry. I think some of them may already be dry, but just to be on the safe side I’m going to give them more time. I’ll be sure to post more of my progress here as I go as well. 🙂


