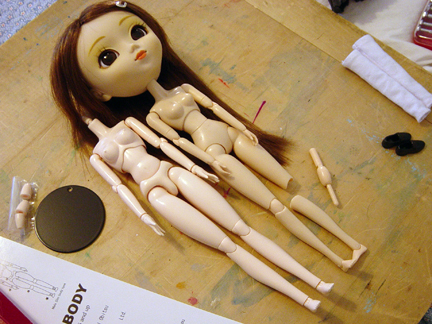
The obitsu I ordered for my Nina arrived on Monday, and I had her new body on her by the evening. I decided to go with the hard bust obitsu because I had heard horror stories about “neck melt” issues with the soft bust variety. However I think honestly I’d probably prefer the 25cm soft bust for aesthetics, but on the other hand I think you get slightly better poseability with the hard bust.
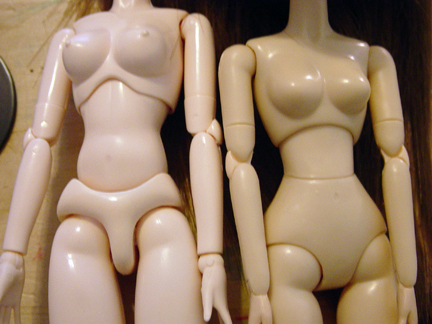
Here is an up-close color comparison of the two bodies. The obitsu body I bought is the white body and as you can see, Nina is a little bit more tan than the white body. However I prefer this over the fleshtone color which you can see a comparison of in this tutorial, just srcoll to the bottom. As it is, Nina’s coloration is inbetween white and fleshtone. The fleshtone color was a little too pinky for me, so I decided to go with white, which as you will see later doesn’t look half bad once it’s on. That and when she is clothed you really can’t tell the difference much at all unless you’re really scrutinizing it.
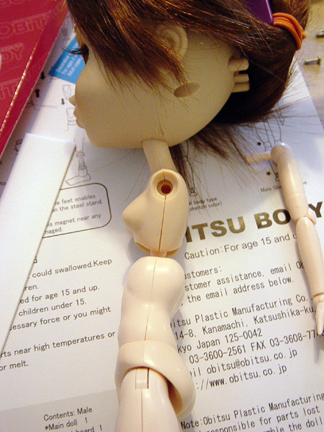
At first I fancied perhaps making a hybrid out of Nina so she could keep her smaller bust without protruding nipples, however whereas the hybridization of the 25cm doll may work, you can clearly see that you cannot hybridize with the 27cm body due to the fact that the tummy portion is to big at the top to fit inside the Type 3 chest socket. After discovering this, I then embarked on removing her wig and scalp so I could remove the back of her head and do the traditional whole body switch. I followed the advice of the same tutorial linked above to guide me through it.
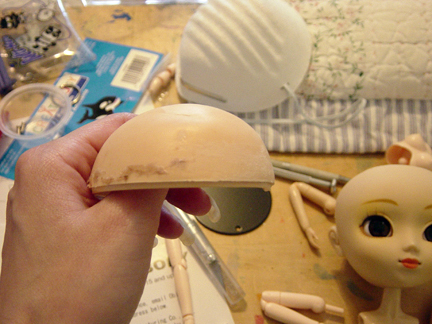
Nina’s wig wasn’t too difficult to get off, but her scalp was another matter since it seemed to me that it was on there a little kaddiwampus and a lot of glue was used to secure it. I was disappointed with the idea of having glue and fuzz all along her scalp, so I decided to experiment with sanding the glue and stuff off. In the shot above it shows where I had started my sanding on the right, and where it was unfinished on the left.
When sanding the scalp, it is going to cause fine scuffing which makes your scalp appear white, but do not worry, as you go up in grit, getting finer and finer, you are eventually able to buff it up quite nicely so it looks like you never sanded at all. I started with a 200 grit sandpaper, then moved up to 400 grit, then 600grit, and then finally I buffed the scalp using an old, very worn, faded and washed pair of blue jeans. If you are going to sand your doll’s scalp I’ll warn you, it is a LONG AND ARDUOUS PROCESS. It takes a lot of time and patience and YOU SHOULD WEAR A PROTECTIVE MASK in order to keep the fine plastic particles from going up into your sinuses, or worse, heading into your lungs. By a protective mask, I mean those little felt masks you get at hardware stores that cover your mouth and nose while you paint or do whatever. I also recommend NOT USING anything below a 180 grit. I experimented with an 80 grit paper in a small part and it made big scuffs that took forever to buff out.
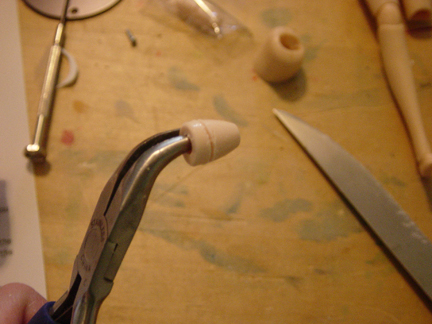
Next came the trimming/cutting of the neck knob. The tutorials suggest using a exacto saw blade, but if you don’t have that a good serrated steak knife will also do the trick. Now the tutorials out there just tell you how much to cut and suggest tools, but none that I’ve seen tell you how to hold that blasted peg while you are sawing away at it. I personally found that holding it between a pair of curved jewelry pliers to be optimal. The curve allows for your hand to be out of the way, and the smallness of the jewelry pliers means you can fit it inside the large knob that you need to cut. Holding it this way, I would saw until I hit metal, turn the knob, saw again until I hit metal and continued all around. It took me all of a minute to do. You can also use the curved jewelry pliers to hold the smaller neck knob that you need to cut, but this time you won’t be able to fit the pliers in the hole and will just have to grip it from the outside.
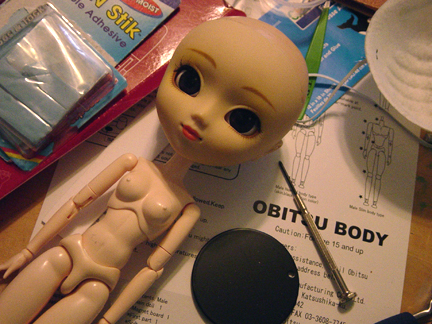
And here’s Nina with her new body and her scalp all nicely buffed. You can still see a color difference, but you may notice that it looks less pronounced because the shadow under her chin helps separate the slight tan of her face from he whiteness of the body. Of course when she is clothed you will hardly tell the difference. 😉
I also wanted to make a note about the magnetized obitsu. On some forums I read that the magnets are supposed to be worthless for Pullip because of her big head, and that the magnets don’t work when you have shoes on. Well I bought the obitsu with the magnet feet to try it, and yes, Pullip’s head is heavy, BUT if you carefully adjust her balance you can get her to stand on the metal disc they give you. Being a BJD person I don’t have trouble fussing over posing so I don’t mind taking the time to balance Pullip, but if you’re impatient it might not be for you. Also as for the shoes part, if the shoes are of thin plastic like Nina’s little loafers are, the magnet is strong enough to hold her up on the plate through the shoes. This will not work however with thicker shoes, but I’ve been wondering if slipping a couple extra magnets in those larger shoes might do the trick. Either way I can’t find that out until I get some thick shoes and magnets!

Hi could you tell me where you bought the obitsu? :3
I bought the Obitsu from JunkySpot, but you can also purchase them through Parabox which is a Japanese store. If you live in the US, then Junkyspot is the way to go though because the shipping will be the cheapest.