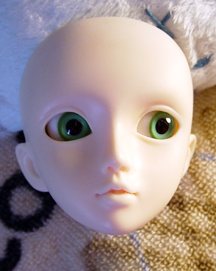
 So for a while now I had been dissatisfied with my Yara’s face-up, as her eyebrows seemed too close to her eyes and her lip color was a little too bland for my tastes. Being an artist I already knew I had all of the pastels and watercolor pencils to do those nice natural face-ups you see online, so after reading some more tutorials I finally decided to take the plunge and I went out to grab a fresh can of Testors and some acrylic gloss.
So, first things first, on every tutorial you start with washing off the existing face-up. I remember that a couple of the tutorials I had seen said to just wash the face with warm water and soap, using a toothbrush for scrubbing. Well I did that and the face-up didn’t budge, not an inch! Though the eyelashes fell right out nicely after the soaking, so I picked them up and saved them for later. I remember thinking to myself that Asleep Eidolon then must seal their face-ups really well, but instead of congratulating myself on the quality of my own doll, I was instead vexed and decided to head over to DoA to find out more about removing face-ups.
On DoA the first thread I come to is recommending using Acetone to remove the face-up, but I’m like, wait a minute won’t the Acetone eat the resin? Curious though, and really wanting to remove this face-up now that I was committed, I read on. Apparently you can use Acetone or nail polish remover to remove the face-up, BUT you need to be sure to thoroughly wash off any residue, because leaving Acetone sitting on your resin will indeed ruin it. I guess there are two different camps on this issue though, those who feel you should not use Acetone, and those who think it’s ok as long as exposure is minimal and you are sure to thoroughly wash it afterwards. Desperate to get the face-up off I decided I would try some nail polish remover that had acetone in it. I did so, and slowly the face-up started deteriorating and I was able to begin to scrub it off. However there are problems with nail polish remover. First of all, if your nail polish remover has any tinting in it, it can stain your resin, and secondly it is still going to take a while and be smelly. I knew from experience with image transfers that pure Acetone would probably work better, so throwing caution to the wind I finally took some pure acetone to my dolls face and within seconds the face came clean and she is not horribly disfigured from contact with Acetone.
So in the end my advice is to screw trying to scrub a face-up off with soap and water. If you have a factory sealed face-up, it is so not coming off with soap and water, not even if you scrub it with a toothbrush or nail brush. This is good news though because it means your face-up is really resilient! Previously before I tried this I thought face-ups were much more delicate than they are. In the end, just use straight acetone which you can get cheaply at any hardware store, just be sure to wash and rinse thoroughly afterwards.
Next I’ll write about my adventures with sealer and whatnot. Right now my Yara’s face has a fresh coat of Testors on it that looks like it’s ready to take pastel. Adventure! XD


